Thursday, May 31, 2012

Strawberry and Cheese Skewers


I had this Dubliner cheese sitting around in the fridge for a couple of weeks. It was a part of a "doggy bag" from a family get together. I have never tried it before and I didn't know what to do with it. It is not the kind of cheese you put on a toast. The best description I can think of is that if Parmesan cheese and Swiss cheese had a baby, it would be Dubliner cheese.
When I don't know how to incorporate something into my cooking, I start thinking what I can pair it with on a skewer. I guess you can call it my comfort zone. I think my blog could have been called Life in Chocolate or Food on Skewers:) So as strawberries are in season right now and I have plenty of them, that pretty much made them an obvious choice to experiment with on these skewers. I added walnuts to compliment the nutty side of the cheese and honey to emphasize the tiny bit of sweetness the Dubliner has. I find that these skewers make great appetizers, and you can quickly transform them into a dessert by simply adding more strawberries.

Ingredients:
strawberries, cut in half
Dubliner cheese (mine is Kerrygold brand), cut in small cubes or triangles
raw walnut halves
honey

Pour some honey into a small bowl and keep a brush in it. Thread a walnut on a toothpick, follow by a strawberry and finish with a cheese piece. The walnut part is the trickiest and takes some practice because walnuts tend to break. Find the thinnest part of it and thread it using a screwing motion. Brush all the ingredients lightly with honey.
To use this dish as a dessert, add a second strawberry half after the cheese piece.


 Enjoy!

Monday, May 28, 2012

Watermelon Salad


Who doesn't enjoy indulging in a watermelon, cold, straight from the fridge on a hot summer day? I always have. As a child I could not wait till watermelons were in season. Where I lived, it was from mid August till the end of October. I also come from a city with an efficient public transportation system and where not every family owns a car. My family didn't own one and a watermelon was a really big and heavy thing to carry home on foot. When I got older, my mom confessed that she was doing her best to avoid buying watermelons:) From the mid August I would start saying: "Mom, watermelons are here, let's buy one." Mom:” No it’s too early, let's wait a little bit till the ripe ones get here”. Beginning of September:"Mom, what about watermelons?" Mom:” No, it's too early” This would go on till the beginning of November when it would be already too late. I still got a taste of wonderful regional watermelons at my grandparents or friends, but the story with my mom was the same every year:) 
A watermelon is an outstanding thing on its own, but if you were looking for a great combination for a salad, feta cheese would be your choice. It is a classic combination - the saltiness of feta cheese brings out the sweetness of the watermelon and vice versa. This particular salad is light and refreshing and is great for lunch or a snack. Usually I like my salad without a dressing, but if you want to add some acidity to yours, I recommend this simple dressing below.

Ingredients:

2 cups arugula
1/4 cup red onion, sliced
2 cups watermelon, cut into small chunks
1/2 cup feta cheese, crumbled

Dressing:
1/2 tbsp white wine vinegar
1/2 tbsp olive oil
salt
pepper

In a large bowl combine arugula and onion. In a small bowl mix together dressing ingredients and add to the large bowl. Top the salad with watermelon and feta cheese and serve immediately. 
Serves 2 

Enjoy!

Friday, May 25, 2012

Manicotti Stuffed With Ricotta Cheese And Meats


Stuffed manicotti has to be one of my favorites from the Italian cuisine. A fantastic meaty pasta dish, its richness making it an instant comfort food. The filling for manicotti is an incredible combination of flavors - hearty soft pork and beef mixture, subtle creamy ricotta, salty and little bit nutty flavor of Parmesan and a unique taste of prosciutto. To me this all sounds like an epitome of Italian cuisine! The filling is also extremely multipurpose as you can stuff manicotti, cannelloni, ravioli, pasta shells with it and even use it in lasagne.  
The sauce used in this dish, Bechamel (Besciamella), is actually a creation of French cuisine, but is quite popular in Italian cooking.  Although it might appear simple at first glance, it plays an important role in bringing the dish together. When added to the sauce, white pepper and nutmeg enhance the taste and give the dish that authentic Italian flavor.  
Try it next time you are cooking a small intimate dinner or hosting friends, this dish would be a conversation starter! 

Ingredients:

8 manicotti shells
2 tsp cooking oil
1/4 cup onion, minced
1/2 cup ground pork
1/2 cup ground beef
1/4 cup (approx. 1 slice) prosciutto, cubed
1 lb ricotta cheese
3/4 cup Parmesan cheese, grated
white pepper
ground nutmeg
salt

White sauce:
1/4 cup butter
1/3 cup plain flour
3 cups milk
salt
white pepper
nutmeg
Parmesan cheese to sprinkle on top

Making the filling:

Heat the oil in a frying pan over medium heat. Add the onion and cook for 2-3 minutes stirring occasionally. Add more oil if needed and stir in ground pork and ground beef. Cook, stirring, for 5 minutes. Transfer the mixture to a colander to drain.
Combine the cooled mixture with prosciutto, ricotta cheese and Parmesan cheese. Season with salt, white pepper and nutmeg and mix well.

Preparing pasta: 

Prepare according to package instructions, as some types of pasta need to be boiled beforehand, while other get stuffed uncooked.

Making the sauce:

Place the butter in a cooking pot and melt it over low heat. Add flour and whisk until well blended. Heat the milk in a microwave or on a stove until almost boiling. Gradually add the milk to butter and flour whisking constantly. Keep the pot on a lowest heat setting and whisk constantly for 5 minutes. Remove the pot from the stove and season with salt, white pepper and nutmeg.

Preheat the oven to 400°F/ 200°C.
Spread 1 cup of white sauce over the bottom of the baking dish. Fill each manicotti with the prepared mixture and place them in the dish. Handle the pasta tubes carefully not to break them. Spread the rest of the sauce over manicotti and sprinkle them with the desired amount of Parmesan cheese. Cover with aluminum foil and bake for 30 minutes. Then take the cover off and bake for additional 10 minutes to brown the top.

Makes 8 manicotti or twice as many cannelloni or pasta shells.


Enjoy!

Tuesday, May 22, 2012

Beef and Rice Soup


There is a joke: one sushi restaurant in Europe extended an invitation to a well-known sushi chef from Japan to visit their place and give his opinion on the menu. They served him a plate of their best sushi. He sampled everything they brought and the manager asked:"Well, how is our sushi?"  And he said:"I haven't tried it yet but I really enjoyed what you served me so far" :)
I think this kind of situation happens all the time when you serve what you think is an authentic dish to a person, whose country this dish originates from. They are always going to say it is not a real thing. I learned this lesson long ago... Actually, no. My mom was teaching me for a long time, that I should often change the name of the recipe so people don't compare it to anything. But of course I didn't listen - I learned it the hard way:)
This dish is the result of my attempts to recreate the soup my grandfather used to cook for me when I was little. It is from Caucasian (Georgian) cuisine and is called Kharcho ("beef soup"). It is quite a piquant soup with lots of spices and greens. I can not call Kharcho the soup that I made following the recipe below, because it doesn't taste like Kharcho at all, but is pretty yummy and aromatic. I mean, the ingredients are the same, but it doesn't taste how my grandfather's soup did. How can this be? But it doesn't matter, I'll work on my authentic Kharcho's recipe, and let's call this particular soup Beef and Rice Soup, shall we? :) Enjoy!

Ingredients:
10 cups water
1 lb beef stew
5 whole black peppers
2 bay leaves
1/2 cup rice
1 onion
1/4 tbsp whole wheat flour
3 garlic cloves
1/4 cup walnuts, blended until resembles breadcrumbs
1 tsp hmeli-suneli (spices combination, can be found in European stores)
8 oz tomato sauce
3 tbsp tomato paste
2 tbsp of lemon juice
10 tbsp pomegranate juice
1/4 tsp paprika
parsley
basil
cilantro
salt
ground black pepper

Wash the meat and place it in a cooking pot with whole peppers and bay leaves. Add water and put it on the stove. When it starts boiling, lower the heat and with a large spoon or a skimmer skim off any foam that forms on the surface. In approximately 20 minutes, put rice in a pot. 
Meanwhile heat the oil in a pan and add onion. Cook it for 5-6 minutes and stir in the flour. Mix well and transfer to a plate. Cook garlic in the same pan for a couple of minutes. Add onion, garlic, walnuts, hmeli-suneli, tomato paste  and sauce to the soup. Stir in lemon juice, pomegranate juice, paprika, salt and pepper and cook for 10 more minutes. Turn off the heat and cover. Add the parsley, basil and cilantro and let it stand for 5-10 minutes for the flavors to develop.

Enjoy!

Saturday, May 19, 2012

Ciabatta Breakfast Sandwiches


I usually resort to some type of a sandwich to get some protein and get me going in the morning. At one point I was ordering Ham & Cheese Artisan breakfast sandwich from Starbucks almost every day. I enjoyed it a lot, but the 3 dollar price tag was bothering me. I decided to try making a similar breakfast sandwich at home. It turned out really good! I think it is even better than the inspiration, because I can change up the meat and cheese options so it doesn't get boring. The cost of making six of them - less than 7 dollars and 20 minutes of my time. I think it's totally worth it:)! I am sorry, Starbucks, I won't be buying those sandwiches from you anymore, but I am your faithful customer when it comes to my Mocca Frappuccino, Latte, and oat bars, and those delicious blueberry scones... Damn you, Starbucks:)

Ingredients:

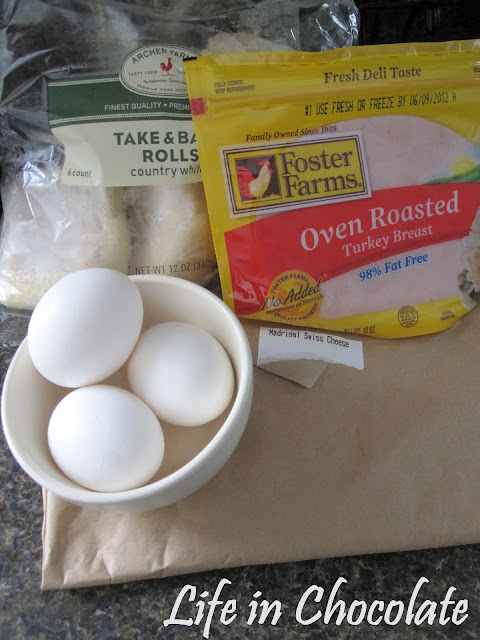
3 eggs or egg whites
deli meat of your choice, sliced
cheese of your choice (I use Swiss or mozzarella low moisture), sliced
ciabatta rolls, cut in half
butter

This is what I usually use to make my sandwiches

Bake the rolls according to package instructions (miss this step, if you are using already prepared ones). Meanwhile heat a little bit of butter in a frying pan over a medium heat setting. Break the eggs into a bowl. Beat them with a fork or whisk until combined. Season with salt and pepper and pour the mixture into the pan. Cook it as you would an omelette. When it sets, transfer to a cutting board and divide into 6 pieces.

Assembling sandwiches:

Put a piece of an omelette on the bottom half of each roll, follow with the cheese, deli meat and cover with the top half.  Place each sandwich in a separate sandwich zipper bag and put it in the freezer.
In the morning put a sandwich in a microwave for 1 minute on a high power setting. Do not over microwave as it can become rubbery and hard to chew.

Makes 6 sandwiches


Enjoy!

Wednesday, May 16, 2012

Easy Herb Pork Roast


Every cook has their own kitchen horror stories. Mine happened on the first Thanksgiving dinner I was hosting. I decided to make chicken instead of turkey because I couldn't find a turkey small enough for my toaster oven. So the guests are at the table waiting for the main course. I take it out of the oven and it looks great and I proudly carry it to the table. My Man starts carving it. It looks all perfect until he hits the bones. And here it comes - the bones look a liiittle bloody... My guests being great friends and supporters didn't make a big deal out of it (maybe they didn't even see the blood, I will never know:). But that was my horror story and for the longest time since then, I refrained from cooking any type of roasts. Then at some point I realized I was missing out because any roast looks impressive on the dinner table and is ideal for big events. I will never master cooking them if I don't try. Now I can tell it all comes with experience and a small, but very helpful device called a meat thermometer. That and a great piece of meat is all you need for a perfect roast.
There are numerous ways to make a roast. Many recipes call for some kind of stuffing, or veggies on the side, or you have to babysit the meat, brushing it with juices every so often. When I don't have time to give this amount of attention to the roast, I go for this recipe. I call it no mess-no fuss dish:)
I usually buy pork tenderloin or sirloin tip in stores like Smart and Final or Costco. I find that they always have a good deal on these types of cut. If I am not planning to make it right away, I just throw it in the freezer. I move it to the fridge the day before I intend to cook it so it can thaw. The next day I do everything by the recipe an hour and a half before the guests arrive and it's ready to be served as soon as they step inside.

Ingredients:

3 lb pork tenderloin
½ tsp sage
½ tsp dried oregano
1 ¼ tbsp paprika
½ tsp onion powder
1 tsp garlic powder
¾ tsp ground black pepper
½ - 1 tbsp kosher salt
2 tbsp olive oil

Mix all the spices and olive oil and let the mixture sit for 10-15 minutes. Meanwhile preheat the oven to 350°F/ 175°C. Line a baking dish with aluminum foil. Put the loin in the dish and rub the spice mixture all over it. Place it in the oven and cook for 1 hour.
Take the dish out and allow it to sit about 15 minutes. Slice and serve with the side dish of your choice. Top with the meat juices from the pan if desired.


Enjoy!


Saturday, May 12, 2012

Caprese Salad On Skewers


I am really fond of appetizers on skewers. They are colorful and fun and most importantly packed with flavor, offering a new taste sensation with every chew. They are always irresistible!:) Besides, these appetizers get an A+ from the presentation standpoint for not being messy. I prefer using toothpicks instead of skewers when making mine, as they are shorter and the food is "cramped" thus creating more flavor impact. 
This particular hors d'oeuvre is a classic Italian combination - subtle and refreshing. It is a great addition to any table.

Ingredients:
Fresh whole mozzarella, cubed
Cherry tomatoes, cut in halves
Sweet basil, leaves cut if they are too big

Optional ingredients:
Dried oregano
Olive oil
Salt

Thread one tomato half on a toothpick or a skewer, follow by a basil leaf, then mozzarella cube, another basil leaf and finish with a tomato half.
Serve it right away or cover and chill for up to 8 hours.


If you prefer a more aromatic version of this appetizer, sprinkle it with dried oregano, salt and oil. But do it right before serving, because the oil and salt make the tomatoes soggy.


 Enjoy!

Wednesday, May 9, 2012

Chocolate Chip Cookies


It took me quite a while to come up with the name for my blog. And I believe that I found The One. Life in Chocolate has both figurative and literal meaning for me. Figuratively it is being in a happy place: being grateful for what I have, being satisfied with who I am, being surrounded and feeling blessed to have an amazing and caring family. It doesn't mean that everything is perfect and I have nothing to work on or to wish for, but I believe that I have the foundation, the most important things, all the other stuff is achievable!
The literal meaning of my blog's name comes from the fact that my favorite food of all times is chocolate:) You can find chocolate in its different forms in my house at any given time. As a teenager I used to come home from school, call my mom's cellphone and say: "Mom, we don't have anything to eat". She would say: " No, we have soup, and there is pasta dish in the fridge." And I would answer: "But we don't have chocolate":) 
As I always have it ready to eat, I make chocolate desserts very rarely. But these cookies made their way into my cooking repertoire. One day we were going to my father-in-law and I felt like making something special for him. He is into chocolate like I am and I decided to go with these cookies. From that day he asks for them all the time. I have to routinely fight with my Man and other family members so they don't I eat all the cookies and I have at least something left for my father-in-law.
Through experimenting I found my perfect cooking time for these cookies - 11 minutes 30 seconds. But it can be different for your oven. I take them out and the top is still soft to touch and maybe a tiny bit undercooked, but they get there during 5 minutes of cool down. They turn out soft, chewy, and with a right amount of sweetness. No amount I make ever seems enough;)


Ingredients:
1 1/4 cups plain flour
1 tsp baking soda
1/2 tsp salt
1 stick of butter, room temperature
1/2 cup golden brown sugar
6 tbsp white sugar
1 egg
1 tsp pure vanilla extract
1 1/2 cup semisweet chocolate chips

Sift together flour, baking soda and salt. In another bowl combine butter, brown sugar, white sugar, egg and vanilla using a mixer. Add the ingredients from the first bowl and mix thoroughly.
Add in the chocolate chips and mix with a wooden spoon until all the chips are evenly distributed and covered with the batter.
Preheat the oven to 350°F/ 180°C. Line the baking dish with parchment paper. Drop tablespoons of the dough 2 inches from each other and from the rims, because the cookies are going to expand. 


Baking time is 10-12 minutes depending on the oven. The cookies are ready once the edges are light brown and the top is light and soft to touch. Take the cookies out and let them sit for 5 minutes.

Makes 18 cookies


Enjoy!

Monday, May 7, 2012

Lentil Soup


With summer approaching I switch to lighter, water-based soups. Lentil zucchini soup is satisfying, colorful and healthy. As a bonus for us, ladies, who are getting ready for the swimsuit season, it is low in calories. It is a perfect lunch or have it for a light dinner in the evening.


Ingredients:

½ cup red lentils
1 tsp cooking oil
½ onion, finely chopped
1 zucchini, diced
2-2 ½ cups water
¼ tsp ground turmeric
salt
pepper

Heat the oil in a frying pan on a low setting. Place the onion in the pan and cover it. Cook the onion for 6-7 minutes until soft, stirring once. Put the heat setting on medium and add zucchini to the pan. Cook for 3-4 minutes, stirring occasionally.
Wash lentils and place them in a pot. Add turmeric, water and the ingredients from the pan. Bring the liquid to the boil. Reduce the heat setting to low and cover the pot. Let the soup simmer for 15-20 minutes (until the lentils are soft and ready). Pass the soup through a sieve. Reserve approximately a cup of the body of the soup and place the rest in a blender. Blend until smooth. Return the liquid, the mix from the blender and the reserved cup to the pot, season with salt and pepper and mix thoroughly. 
Serve hot with crackers or toasts. 


Makes 3-4 servings 


Tips:
  • For a richer flavor, use stock as a base for this soup
  • Adding meat is another great way to enrich the dish

Enjoy!

Friday, May 4, 2012

Mediterranean Style Meatballs


Many of the dishes I make are in one way or another inspired by different places my Man and I go to. I got the inspiration for these meatballs from a hookah lounge we frequent at. They serve amazing Mediterranean dishes - different kinds of meat with veggies and warm soft pita bread and lots of mouth-watering sauces. At that place, for many people, smoking hookah comes first to eating, for me the food is the priority:)
To create these flavorful meatballs I added cauliflower to a mix of pork and beef. The flavors of carrot, parsley and garlic give them the Mediterranean twist that I crave.
These kinds of dishes are also a great way to incorporate vegetables like cauliflower or broccoli into the diets of people who otherwise don't like them. I think we all have at least one of those picky eaters in every family:) This way they still get all nutrients from the vegetable without even knowing it.

Ingredients:

½ lb ground beef
½ lb ground pork
a little less than a cup crumbled cauliflower (thoroughly blended until resembles breadcrumbs)
1 medium carrot, grated
2 cloves garlic, minced
parsley, finely chopped
cooking oil
salt
pepper

 
In a bowl combine beef, pork, cauliflower, carrot, garlic and parsley. Season with salt and pepper. Mix thoroughly with your hands. Add 1-2 tablespoons of water so the mixture is more pliable. Cover the bowl and put in the fridge for 30 minutes (or overnight if necessary). 

Form into 6-7 ovals.


Heat the oil in a frying pan on a medium setting and place the meatballs in the pan. Cook them turning frequently until light brown from all sides.
Preheat the oven to 375°F/ 190°C. Place the meatballs in a baking dish and cook them in the oven for 20-30 minutes. When the meatballs are ready, serve them with a side dish of your choice.


Mediterranean Style Meatballs served with couscous salad

Tips:
  • Serve meatballs with yogurt-cucumber sauce (tzatziki) or tomato sauce

Enjoy!